Web-based Authentication
To use this, you will need:
 User Accounts. These are the same ones that are used for
https://app.proda.ai.
User Accounts. These are the same ones that are used for
https://app.proda.ai.
 To register
your redirection, login and logout URIs with PRODA.
To register
your redirection, login and logout URIs with PRODA.
Please contact us to get started.
The API is callable over HTTPS from any javascript application.
Once authenticated, you can use the endpoint as described in our API reference
Authentication Sample
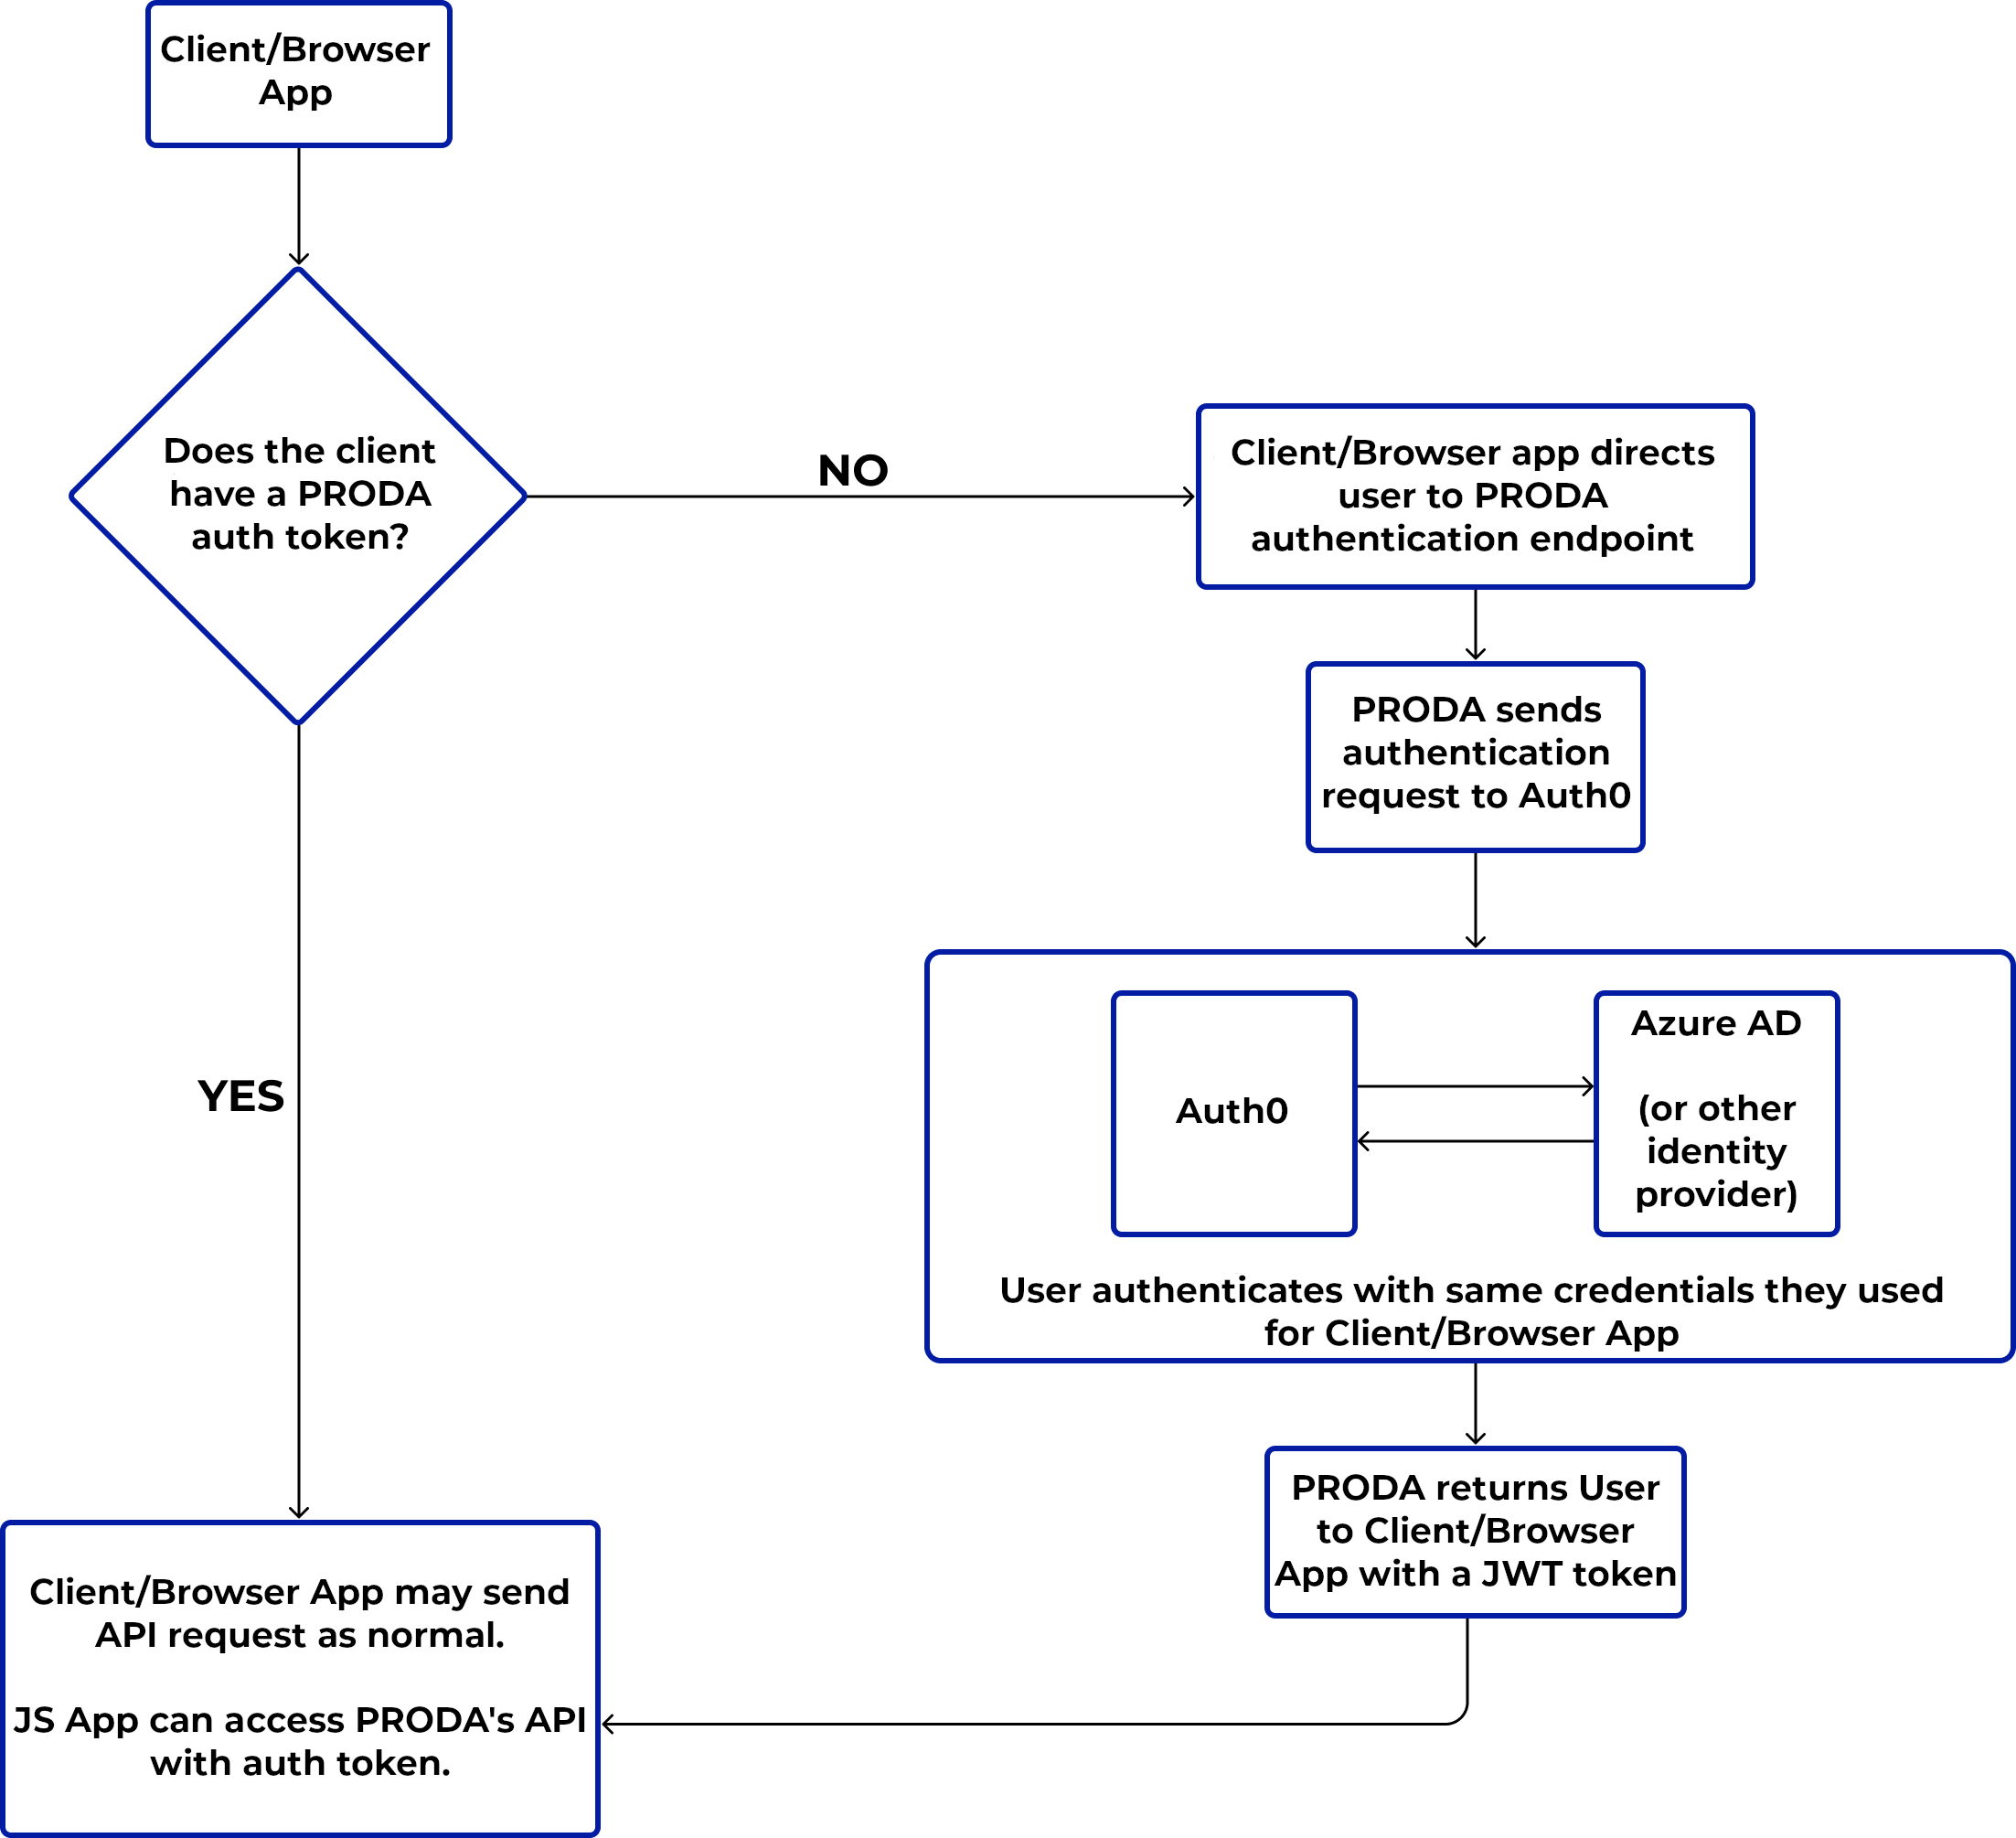
PRODA uses Auth0 to authenticate users. Therefore your app will need
to direct its users to an Auth0 authentication flow so that your app
can acquire a JWT token. This JWT token must be passed through in an
Authentication: Bearer xxx header in most HTTP calls to
the API. You can read more about this in the
Auth0 Quickstart Guide
or the
Auth0 SDK Documentation.
To use refresh tokens, set useRefreshTokens to
true when configuring the Auth0 client. For more
information about refresh tokens, please refer to the
Auth0 Refresh Tokens Documentation. We also have an example here.
First, you'll need to intialize the Auth0 SDK, perhaps with the following JS:
let auth0 = null;
let user = null;
let jwtToken = null;
let allDatabases = null;
const redirectUri = "[THIS PAGE]";
const prodaEndpoint = "https://app.proda.ai/thirdparty/";
const config = {
    domain: "proda.eu.auth0.com",
    client_id: "hW557uKMZavZfZvyNGDMdNnobyUfPqhK",
    audience: "https://app.proda.ai/thirdparty/",
    redirect_uri: redirectUri,
    useRefreshTokens: true
};

const configureClient = async () => {
    auth0 = await createAuth0Client(config);
};

window.onload = async () => {
    await configureClient();

    const isAuthenticated = await auth0.isAuthenticated();

    if (isAuthenticated) {
        // show the gated content
        return;
    }

};
Note that the Client ID and Audience have already been filled in for you, but this code will not work unless your redirectUri is, too.
At this point it would be handy to include a login button.
<button id="btn-login" disabled="true" onclick="login()">Log in</button>
<script>
const login = async () => {
  await auth0.loginWithRedirect({
      redirect_uri: redirectUri
  });
};
</script>
When the user clicks the login button Auth0 will authenticate and
send the user back with a code and
state state parameter for the login attempt in the URL.
We can read these and send them back through the SDK to get a JWT
for PRODA's API like so:
const query = window.location.search;
if (query.includes("code=") && query.includes("state=")) {
  await auth0.handleRedirectCallback();

  updateUI();

  // Use replaceState to redirect the user away and remove the querystring parameters
  window.history.replaceState({}, document.title, "/");
}
const updateUI = async () => {
  const isAuthenticated = await auth0.isAuthenticated();

  if (isAuthenticated) {
      jwtToken = await auth0.getTokenSilently();
  }
};
Making Requests
After the user logs in, we should have a JWT access token and we can
start making requests. We just need to pass it in as a
Authorization: Bearer token. Perhaps like this:
const getDatabases = () => {
const reqBuilder = customXMLHttpRequest(jwtToken);
const req = reqBuilder('GET', prodaEndpoint + "databases-list", true);
req.onerror = function () { alert('Error'); };
req.onload = function () {
  if (!req.response || req.response === '') { alert('Some error happened'); }
  else {
    document.getElementById("databasesResponse").innerText = req.response;
    allDatabases = JSON.parse(req.response).map(x => x.databaseId + '').join(',');
  }
};
req.send();
}

const getProperties = () => {
const reqBuilder = customXMLHttpRequest(jwtToken, allDatabases);
const req = reqBuilder('GET', prodaEndpoint + "properties", true);
req.onerror = function () { alert('Error'); };
req.onload = function () {
  if (!req.response || req.response === '') { alert('Some error happened'); }
  else {
    document.getElementById("propertyResponse").innerText = req.response;
  }
};
req.send();
}

const customXMLHttpRequest = function (jwtoken, databases) {

function getXMLHttpRequest(method, url, async) {
  var xmlHttpRequest = new XMLHttpRequest();
  xmlHttpRequest.open(method, url, async);
  xmlHttpRequest.setRequestHeader('Authorization', 'Bearer ' + jwtoken);
  if (databases)
    xmlHttpRequest.setRequestHeader('X-Company-Databases', databases);
  return xmlHttpRequest;
}

return getXMLHttpRequest;
};
You should now be able to have a working web app that fetches data from PRODA. Continue reading the full API reference.
If you have a PRODA user account, you can try using the PRODA API right away to access the data from your user-account. Navigate to the example application (bottom of that page) which uses web-based authentication, querying different endpoints to extract rentroll data.